Lighting
To make your scenes in CopperCube more interesting and alive, light and the absence of light - dark/shadows, is essential!
By selecting an object in your scene, you may choose "static" or "dynamic" (under materials). The most often most vivid setting is to use "dynamic" on all object textures and to use both the directional light and the point lights in the scene. Also in the scene graph, select "scene" and "attributes" in order to select "shadows".
Under scene-attributes, you may also change the background and surround colours. This may also darken or lighten your scene, thus making it more day or nightish.
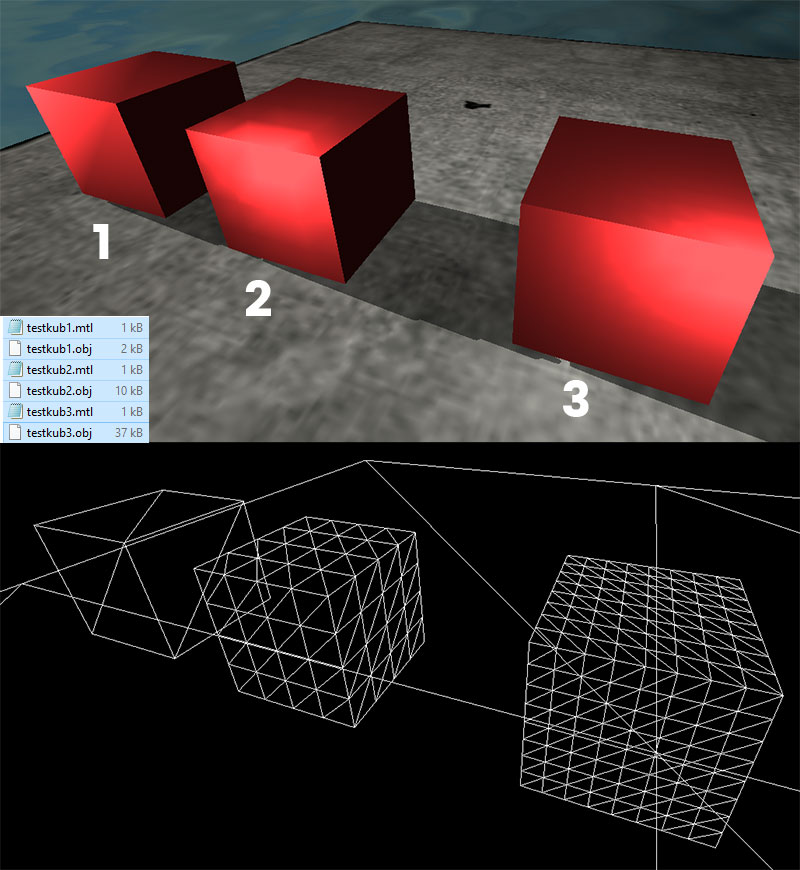
With these settings some of your objects might still display as dull, and sometimes hardly even reflect light, and if so, they perform in a very clumpsy manner. Why is that, you might ask? This might probably have to do with the amount of polygons. You can easily check in CC if an object has very few or quite many polygons: Put your dull object in the viewport and press Ctrl+w for wireframe mode. If it has very few polygons, there is probably your answer. You'll need to import it into your 3D-software and for example subdivide it so it receives more polygons. Then bring it into CC again to see how it performs.
An example is shown below, with three cubes which has a plain colour texture added to them. As you can see, they perform very different when a point light is near them. In the wireframe mode, you can clearly see that the left cube only has one face/side. The second has 16/side and the third cube to the right has a lot more - 64/side. Therefore, the last cube has a higher polygon count and also a much smoother shape which also reflects light in a more natural way. The right cube is of course also larger in size - 37kb compared to the first cube's 2kb.
Is a side of the object, or most of the object still very black - hardly not reflecting light at all? Then you migth have a normals problem. This is solved by importing it into your 3D-software of choice, select the "wrong" faces and find a function to "flip the normals". It's like thinking of a mirror, where the reflecting part was held away from you, and when you flip it, it reflects you.
So, for better lighting in the most vivid conditions, generally add more polygons, but think about the size as well when it comes to more advanced objects. One tip is to have more polygons only on the sides of the objects that are visibile to the player. The other sides can be really low poly! (also of course, for lower file sizes: work on your textures to keep them as effective and small as possible). Another tip that might work in certain occasions, is to paint light and shadows directly onto your textures.
